One of the best ways to cultivate the plants, herbs, flowers, and bushes is to have a garden tower to cultivate these bushes, plants, and herbs.
The garden tower is an excellent way of doing this because it saves a lot of space, and even if you have a small garden, you can also have a garden tower.
Mainly, garden towers are preferred in a small backyard or garden.
However, many people do not have this much space, and still, they are looking for garden towers to place on their front porch or even on their balconies. So, there must be something about garden towers that everyone wants to place in their spaces.
But the garden towers are not cheap. They are expensive, and you will have to spend a hundred dollars to place them in your space.
What is a Garden Tower?
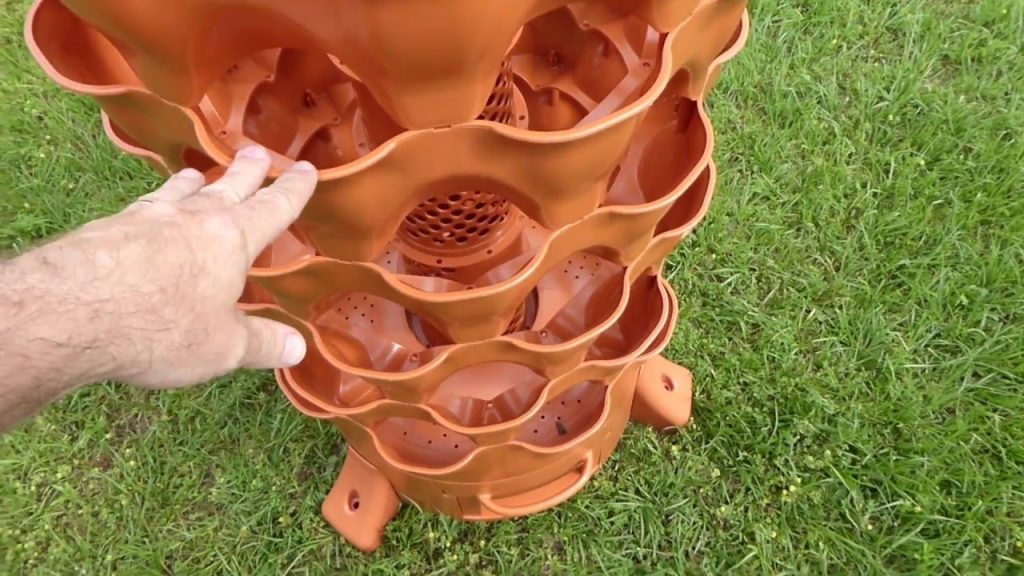
A Garden tower is an efficient way of cultivating some plants, flowers, and bushes in your garden or yard. They are pretty awesome and add some value to your garden or your space where you have placed them. Despite their features, they are not so cheap to be purchased without knowing about them. You will have to spend a lot of money to get them into your spaces.
Many people cannot afford to have a garden tower in their spaces, but they want to have a tower for their porch or balconies. As a garden tower is a one-step solution for vertical planting, everyone cannot afford it. So, in this article, we will discuss how to make a garden tower from a barrel. It will be useful as the garden tower itself, but it is cheap and can be afforded by anyone.
Many people have a large barrel lying in their garage or storeroom. However, if you do not have a large barrel and you need to purchase one, you should go for it because it will cost much less than purchasing an actual garden tower. Most of the items you will be needed to make a garden tower from your barrel will be found in your home. This task is nothing but a cool afternoon project for you.
What Will You Need?
The first and foremost thing you will need to make a garden tower from a barrel is the barrel itself. You may find a large barrel in your storeroom or your garage, and if you do not have one, you can purchase one from any nearby store. There are some materials that you can also use as an alternative. Still, it will be useful if you use the prescribed materials for making the garden tower.
A Barrel
[amazon box=”B010DBE58S”]A large barrel is required because it will have adequate space to plant all the flowers and bushes you want. If you want to plant more things, then you should go for a large barrel. Otherwise, a small barrel will work also. One of the best choices will be to take a 55-inch gallon that is of plastic and is already open at one end.
PVC Pipe
[amazon box=”B00V67XP0I”]The next thing that you will be needed to make a garden tower from a barrel is PVC pipes. A garden tower needs a robust compost tube that will pass through the barrel. So, PVC pipe will be an excellent choice for this task. A PVC pipe should be of 4-inches in diameter and about 50 inches long. This site will be perfect for a PVC pipe. Once you fix this, the actual length may vary according to your barrel.
PVC Drain Cap and Cleanout Adapter
[amazon box=”B07D4BQ4KQ, B00PCR7LSA”]Once you are done with the above two steps discussed, the next thing you should keep ready is the PVC drain cap and cleanout adapter. All of you must be wondering, why? The drain cap and cleanout adapter are required for the lower end of the compost tube you are making out of PVC pipe. This is required to keep the lower end tight enough.
The next thing that you will have to keep in mind is that the height and the size of these drain caps and cleanout adapter should match the diameter of the PVC pipe. The drain cap and cleanout adapter are required to keep the compost tube in a tight shape for the barrel to be passed.
PVC Cement and Silicone
[amazon box=”B07222DDFR, B00NU6VN6G”]PVC Cement and Silicone are required to fix the cleanout adapter and the drain cap. Well, the drain cap and cleanout adapter are not going to be fixed automatically. It would help if you had something to fix them in their right places.
For this, you will be required PVC cement and silicone that will fix them in their places. However, you can try other items for the same task, but PVC cement and silicone are trusted enough to fix this.
Once you place the compost tube, cleanout adapter, and PVC drain cap in their correct places, you will be able to fix them with the help of PVC cement and silicone. We suggest using PVC cement and silicone only because they are trusted enough to fix things like cleanout adapter and PVC drain cap.
Soil, Kitchen Scraps, Worms and Plants
[amazon box=”B07P9FBY7K”]About 50lbs of soil mixed with plants, worms, weeds, and other nutrients are required for this task. This mixture has to be added to the barrel that you are trying to make. You will also have to make a list of the plants you think you will add to the barrel.
Along with these things, you will be required with other things like a jigsaw blade, sandpaper, marker, and something to elevate the barrel.
Making the Pockets of the Barrel
The first and foremost step for adding plants to the barrel is to make the pockets add the plants’ roots. For making the pockets, grab a marker and a ruler to outline the area where you have to make the pocket. Also, make sure to draw the lines carefully so that the pockets can be made of perfect size, neither too small nor too large.
Do not worry about the cuts, as when your plants start growing, and you will not see the cuts in the barrel. All you need to do is make the pockets wisely to get enough space to fit the plants’ roots inside them. Also, while cutting the round barrels, you will have to pay extra attention as it is risky.
Once you are done with the proper cuts, the next thing is to make them moldable, and for this, you will be required a heat gun to provide heat from outside and inside so that it will get molded from all sides. If you want to make this step a bit easier, then you can mark the space with a marker and can heat only those areas that have been marked.
More so, if you are facing difficulties in any of the process that we have discussed, you can try to reheat the area and mold it into another shape. The most crucial step is to make the cuts to pay extra attention to this task. You can also use a marker and ruler to indicate the particular area that has to be heated.
Create the Drain
The plants and bushes require enough amount of water to grow well. For this, you need to provide drainage so that you can supply the water through the barrel. So, now turn the barrel and start working to create a drain for the flowers and plants that will soon be grown in the barrel.
Now, you need to draw the shower’s shape and make holes the same as a bathroom shower. You can roundly make these holes if you want to picture it as a bathroom shower. You can do it correctly if you draw a circle with a six-inch diameter and then make the appropriate holes within the circle.
Prepare the Compost Tube
Now the most critical task is to prepare the compost tube. Turn the barrel upside down and then try to fix the compost tube into the barrel’s hole. You have to make the appropriate hole so that the compost tube can be fixed inside this hole. This is a bit trickier, but you will have to do this in such a manner that the compost tube gets fixed in the barrel.
Also, drill proper holes in the compost tube. These holes are required to provide the barrel with weeds, worms, and kitchen scraps for the soil. You can also provide the compost a mixture of soil that will be good for the plants’ growth.
In the end
The task looks easy, but it requires a lot of patience and continuous learning. Once you learn these steps, then you are all set to go.





Comments