With the Christmas festival coming in, the festivities and holidays are going to begin soon. And holidays call for get-togethers, meeting friends and families and it is party time! While you would want to host home parties, you will also have to take care of your home’s decorations to make it festive-ready.
How wonderful would it be to illuminate your garden and home with firefly mason jar lanterns and add that classy touch? Here is presenting you with simple ways of how to make firefly jars at home.
The firefly jars are simple and quirky and add a bright touch. It also adds a glistening effect in all the pictures that will be added to your album. You would not want to step out too often to get things prepared for your house party and would like to get things ready at home itself.
Making firefly jars is super fun as well. I am sure you will love the process as much as the after-product. Try out this simple tutorial of how to make firefly jars and light up your space!
Things You’ll Require to Make the Firefly Mason Jars
Before I mention making firefly jars, you will have to get hold of a few things. You may already have them at home, get it from the local store, or order online from any e-commerce sites like Amazon (amazon.com) or so on. The essential things are as follows; please go for the organic variant, which are environment friendly.
- Large mason jars (you may take up as many as you want, three, four, or more, and you may even take up medium or small-sized pots)
- Glow sticks of different colors (you will need one post per jar, so get it accordingly. I would recommend going for darker shades of blue, purple, red, green, and so on)
- Glitters in various colors (you will have to color-coordinate it with the glow sticks)
- A pair of scissors
How to Make Firefly Mason Jars
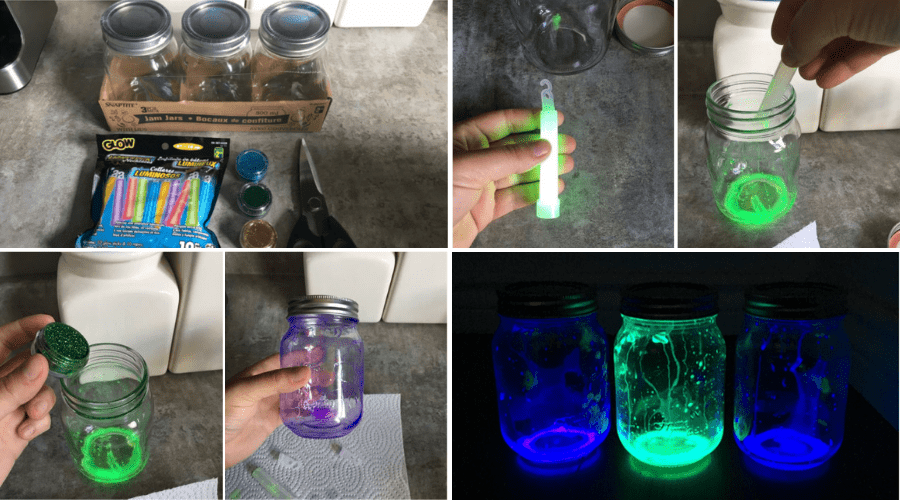
Please follow these steps, sequentially, to make your DIY Firefly jars at home.
Step 1
Take a clean mason jar, remove the lid, and allow it to air out for some time. Please make sure it is scorched, or else the glue from the glow stick will not stick in the jar. Wipe the insides dry with a cloth to be sure.
You would not want to risk this bit after you have made it entirely.
You may take any sized jars, but if you have a large space to decorate and want only three-four pots, I suggest you take big ones. Or if you are going to line up your balcony with these beauties, you may go for smaller ones. It depends on your area selection.
Step 2
Now you need to take a glow stick and crack it so that the fluid gets activated. Few glow sticks need to be shaken first, read the instruction on it, and follow it accordingly. This cracking is an important step. If you do not do it, the fluid from the glow stick will not glow when you place it in the mason jar, so do not overlook this step.
Step 3
After this, you need to grab your pair of scissors and cautiously cut off the tip of the stick. Make sure you are careful and do not spill over any fluid. In case you do, wipe it off immediately. Now, pour the contents directly into the first jar. It is best to use one stick per jar.
Some companies use toxic materials to make the fluid of the glow sticks. Be careful not to bring it in contact with your skin. If you still come in contact, then immediately wash off your hands. It is essential to clean your pair of scissors after use, as well.
Step 4
Next up, it is time for some sparkles. It would help if you now paired your glitters with the glow stick. Select colors that go well with each other, either matching or contrasting; it is on you to decide.
If you are concerned about the number of glitters to use per jar, I recommend about one-quarter portion of a teaspoon for a large pot, which is not too much or too little. When it comes to glitters, even a little less is more!
Often, glitters are made with micro-plastic, which are tiny particles of plastic. Save the environment from plastics and go for the organic ones when you purchase them. It will help reduce the carbon footprint.
You must be having fun doing this and would be eager to share with your friends how to make firefly jars so thoroughly and quickly at home.
Step 5
Remember, we are performing all this with the lid away, now is the time to put the top back and give a nice shake to the jar. The jar contents would now start to stick to the insides, but it would also pool back to the bottom of the jar.
Do not worry; this happens because the fluid is not dry. Wait for a few more minutes and give a second round of shake to the jar. You may have to give it shakes at intervals so that the fluid and glitters stick to the sides properly. Once there, you may stop this process. Approximately 3-4 shakes would be good to go.
Step 6
Repeat the above simple steps for other jars as well. As I mentioned, you must find the perfect color combinations, and your pots will look cute and pretty. You may choose colors like blue, purple, red, green, and so on.
You may even add some small black cut-outs in the jars so that they give a fairy-like appearance. Or you may add artificial flowers and use the jar as the centerpiece. The sky is the limit when it comes to creativity, and you could brain-storm and enhance the beauty of your jars.
Step 7
Once you get all your jars ready, it is time to select the spots to place your quirky jars. You may want to put it indoors, like in your child’s room, near the staircase, to light up some corner or just anywhere. You may even place it in your backyard, maybe along the walls or on the barks of the trees. You may also line up the jars on your balcony near your potted plants.
There is no particular space to put these jars, play around with your designing skills, and decorate your area for the next party at your home. Please wait for the nightfall to experience the beauty of your creation and words of appreciation from your guests. Whichever place may it be, expect to click some pretty pictures there.
Remember that the fluid from the glow stick has a fixed life span to glow. After a few days, it will lose its ability to shine, so maybe you can use it for a one-time event. In case you want to know how to make firefly jars last longer, you have to replace the glow sticks with the paint which glows in the dark and follow the same steps as mentioned above.
Concluding Remarks
The jars look like there are real fireflies caught in the jars. It reminds you of the times when, as a child, you would follow the fireflies and be delighted to capture them and then store them in jars. The result of this would take you down the memory lane of your childhood, how you would admire the fireflies and run after them like fairies.
I am sure you will thoroughly enjoy making the DIY firefly mason jars at home. It is a simple yet stylish element to add to your families, be it indoors and outdoors. The firefly jars add a perfect touch to your evening parties.
With the festive season around the corner, add these beauties to your home to up your game in home decor. Be ready to share the procedure of how to make firefly jars with your guests also. Even when the guests are off, you will enjoy sleeping in the glistening light radiating from the jars.






Comments